Thursday, February 23, 2012

Elegant Edges Cartridge


Today at My Cricut Craftroom, we were to use the Cricut cartridge "Elegant Edges" to create our project. I was PLANNING on attending a bridal shower for my sweet niece this past weekend in Pittsburgh, but my body decided it had other plans! I ended up in the hospital over the weekend with diverticulitis! NOT FUN! Luckily, I had her gifts and cards all ready to go and my sister and law and niece who live near me were able to take my gifts to the shower for me!
I decided to make this card for one of the gifts using Elegant Edges. There are so many cute cuts on that cartridge!
To make this card, I used the heart border and the shadow heart border to make the cute little trim at the bottom of the card. (These cuts can be found on page 26 of the handbook).
I also used the Sweethearts Cartridge and cut the LOVE sentiment on page 34 and then the two cute swirl hearts, also on the Sweetheart cartridge, page 35. The hardest part of making this card was that I was using some Bazzil paper for the border cuts and that was a little tricky in finding out what pressure to cut it on. I found that slowing the speed down to medium but setting the blade on 4 and cut pressure at high was the trick!
I ran the top layer through the Cuttlebug to emboss it with Swiss Dots.
I hope my niece Kaity liked the card. I sure wish I could have been there to see
her open it and all the gifts!
Please visit MyCricutCraftroom.blogspot.com to see more projects today
with the Elegant Edges cartridge!

Tuesday, February 14, 2012

It's Card Creating Tuesday!

Hello Crafty Friends!
HAPPY VALENTINE'S DAY to you all! I hope it is a lovely day for all of you!
I am excited to share a card on this special holiday. I was so very lucky to get to meet with Erica and my Design Team "sister" Sue Ann in Cincinnati in January. When we met, Erica shared some papers that she asked us to use to make a Valentine's Day card. Here is my take on it!
The adorable papers are from Doodlebug Designs and the Sweet Treat collection and I just LOVE them! It was hard to select what papers to use.
With the adorable cakes and cupcakes on the paper, an "obvious" accent would have been a cute and adorable cupcake. I decided to take a closer look at the images and saw there were strawberries on there too.... well, I love strawberries and I REALLY LOVE Chocolate Covered Strawberries! What a great Valentine's idea! So I went with the Strawberry on Celebrate With Flourish. I just love that cut! It is not showing up in my photo, but I used Glossy Accents on the "white chocolate" portion of the strawberry and it looks so much like a White Chocolate Covered Strawberry! YUM!
I used Elegant Edges to cut the half circle and for the word "love" - I used Cake Basics! With a bit of Doodlebug Bakers Twine tied up on the side and some foam dots to give more dimension to the card - it seems like the perfect Valentine!
What do you think?
How are you celebrating Valentine's Day? I hope it is a very fun day for you!
Thank you so very much for stopping by and I would love to hear your comments!
To see more projects like mine, please be sure to visit Erica's blog at:
www.mycricutcraftroom.blogspot.com

Monday, February 13, 2012

Happy Valentine's Day!


Hello Friends!
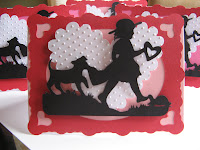
Just sharing a Valentine I sent out to family members this year. It was a very simple card - I used A Child's Year for the main cut of the little girl and the dog. Doodlecharms has the cute scalloped heart and the frame was cut from Elegant Edges. I used foam tape to give a little "pop up" the heart and the little girl/dog and"Cuttle -bugged" the heart with Swiss Dots.
What are YOUR Valentine Day plans? Come back tomorrow to see my Design Team post for Valentine's Day!


Wednesday, February 8, 2012


It is my day to post in My Cricut Craftroom for Would You Ever Guess Wednesday, (we call it WYEGW) where we are able to use ANY cut on a Cricut Cartridge that is NOT a featured cut on the main page of the booklet. This week Erica asked that we use the feature key "TAG".
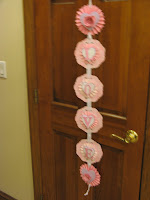
I chose to make a Valentine Banner. I decided I needed to try a home decor project for a change and picked the Art Philosophy cartridge as my main cartridge and also used Ribbons And Rosettes.

.
I decided to use the word "LOVE" as the featured word on my banner and wanted to make
a vertical wall hanging for my door.
I started by cutting out all of my base tags from chipboard. I found that using the multi-cut feature I only had to cut it two times, when using max pressure. My chipboard was a medium weight, all recycled from pizza boxes, cereal boxes and cracker boxes! Doesn't it feel good to use something we would otherwise throw away and make something pretty from it?

I selected the Tag Feature on page 51 of Art Philosophy. I have not had this cartridge for very long and have only made a few cuts from it, but OH MY GOODNESS!! ..... I can tell this is going to be one of my very favorite cartridges and will soon be a "go to" cartridge of choice!
I used my Gyspy for designing. I cut out four of the tags and I rotated them to a vertical direction instead of the way it is pictured in the booklet.

I then cut my pink patterned heart paper (old paper from my "stash" - in my attempt to use up what I have! ) to cover all four base tags (one for each letter in the word L-O-V-E (obviously of the same size as their base chipboard to cover perfectly!).

I then selected the Font Layer to cut the capital letters (found on various pages throughout the booklet) and used the Hide Contour feature to eliminate the decorate circles. I like the way those decorative letters look, but didn't want to do a double layer on the letters, so using the decorative cut outs really made no sense!
I then cut the Scallop6 cut from the Ribbons and Rosettes cartridge on page 41. Using my Gypsy, I welded several of the cuts together and then manipulated another cut to get it to the total length I wanted.

I then cut out two heart shapes from Ribbons and Rosettes on page 30, one slightly larger in lavender and a smaller one in white to layer and make them stand out a bit more.
I added each of my letters to that after first embossing the 2 sets of hearts with the Heart Swirl embossing folder.
I added silver stickles to the letters to make them stand out a bit more and did a lot of foam tape to add even more dimension to the project.
Cutting two slightly larger rosettes to add to the top and the bottom of my wall hanging was the final step in my design.

I decided it needed a little more embellishment so I decided to add paper flowers.... both from the wonderful Art Philosopy cartridge, one from the font feature on page 69 and the other was shift key of the font on page 68. I just got a new quilling tool that makes rolling those flowers a lot quicker and easier!
Inside each flower, I added a rhinestone with my I-Rock tool to give a bit of "bling"!
It was difficult to get a very good photo of the entire banner - but here are a couple more views:

You can click on ANY photo to make it larger and easier to see the detail!

I hope this inspires you to make a little home decor of your own and to explore the many cuts you can find on every cartridge by looking at the various feature keys!

I was so touched by the kind comments from my last posting for the Blog Hop I participated in and would sure love to hear your thoughts on today's project.

Thanks for visiting. To see more projects for WYEGW , please be sure tovisit some of the other wonderful projects at Erica's My Cricut Craftroom!

Have a great day!

Saturday, February 4, 2012

100 Cartridge Blog Hop


Welcome to My Cricut Craft Room's

100 Cricut Cartridge Blog Hop


You should have started at http://mycricutcraftroom.blogspot.com/ if not please start at the beginning


Hello!

It is the first weekend in February and it is time for the

100 Cartridge Blog Hop with Erica's My Cricut Craft Room!

This is my first opportunity to participate in a Blog Hop with a project (projects, in this case!).

You should have arrived here from Vicki's Blog


I selected to use the following 3 Cricut Cartridges in my projects for this month:

Winter Woodland, Birthday Cakes and Wedding/Marriage

BIRTHDAY CAKES, WINTER WOODLAND AND WEDDING SOLUTIONS/MARRIAGE

Project Number One

My first project was a birthday card for my daughter who just turned 2121 on her late January birthday! She loves tea - and I AM SURE that was her beverage of choic E n her 21st birthday, aren't you??

But knowing she really does enjoy a nice cup of tea and that I got her a really cute tea set as one of her Christmas gifts - I designed a tea set birthday card just for her!

(I sent her a "store bought" card to get there in time for her birthday but I have yet
to send this one! Time to get it in the mail, don' t you think?)

It is a unique shaped card. I used the Tea Pot from the Birthday Cakes Cartridge (page 44). Using my Gypsy, I welded two small rectangles (from Plantin Schoolbook) to the bottom of the tea pot to form the fold out arms. From there, I attached the tea cup, also from the Birthday Cakes cartridge (on page 54) ) on the right side and also attached a rectangle (from Plantin Schoolbook) to the left side.


I then got to work doing some decorating. As you can see, I embossed the tea cup in the Cuttlebug using my Tiny Bubbles embossing folder. I cut some extra hearts from the teacup page and used them across the bottom rim of the card, front and back.


I made a double layer of the front of the teapot so I could cut a slit

and slide in an actual tea bag as a special little gift!


As a fun embellishment, I strung beads on a wire and then wrapped it around the base of the teacup.


The teacup was cut two times, both sides embossed and then

glued onto the base of the card.


Difficult to get a good close up view of the wrap around beads,

but I think you can understand!


The front left side says "Happy Birthday" on the front and I left

the back of that rectangle blank for the sentiment/signature.


The back was covered with decorative paper as well

and the base was also decorated with hearts. The butterfly

is my "signature" stamp that says

"Created with Love by Teresa Kaufhold"

n to Project Number Two!
Pillow Box As A Bridal Shower Gift


I used The Wedding/Marriage Solutions Cricut Cartridge to make my next project.
My niece is getting married in May and she is having a bridal shower in February.
As one of her gifts, I made a pillow box in her wedding colors.

My niece is having a Bridal Shower in a couple of weeks so I made this for her!

Kaity's Wedding Colors are shades of blue with a touch of pink!

I used the bridal gown cut and did one layer in a shimmer paper layered over another shade of white plain paper. I used dots of stickles across the bodice of the dress for some "bling" and glamour!


I used the base heart cut for the heart and then welded Kaity and Adam's names inside the heart. I used foam dots to pop up the dress off the box and a "gem" to dot the "I" in Kaity's name.

On the back, I cut the swirl heart that I just love from the Wedding/Marriage cartridge.

Now to just figure out what to "hide" in my pillow box!

, Project Number Three!
osty Kisses

A Valentine Treat Holder
Last But Not Least = a treat bag topper for Valentine's Day!


For this cute treat bag, I used the Winter Woodland Cartridge and

cut the image "Frosty Kisses" (page 65) out of mirrored silver page

(for the cool, frosty look) and the word "Kisses" out of red paper.

I cut the Base shape to layer the words on and then layered those

words on top of the tag shape on the same page.

I felt the silver paper and the foil wraps gave the "frosty" look to this project!


Using the Cuttlebug and the Swiss Dots embossing folder, I embossed the

red layer of card stock.

I cut a rectangle of the silver mirrored paper, embossed with the Heart Embossing folder in the Cuttlebug as the header for the treat bag.

I used form squares to raise up both the swiss dot tag as well as
the base layer behind the words Frosty Kisses. I love the
dimension this has!
The silver mirror cardstock is also embossed on the back side.


To give a special little "added touch" I cut
circles from page 32 of Winter Woodland

on the bottom of the kisses.


I am very happy with how this little treat bag turned out!

What do you think? What are your Valentine Plans?
Please leave a comment!
Your next stop on the hop will be

Be sure to head over to
see what great projects

Gloria C has to share with you!


http://craftnthings.blogspot.com/Also make sure to follow Erica's blog so you will know when she has contests, prizes, challenges, swaps & special online coupons.

Currently she is running a Scrapbook & Card challenge over on her challenge blog and you can win a gift certificate to her webstore! http://ericascraftroomchallenges.blogspot.com/

This Friday she will announce February's Scrapbook swap.... She has a swap each week and you have two weeks to make your project each month. There will be a card, scrapbook, tag, die cut and embellishment swap each month! http://ericascraftroomswaps.blogspot.com/

Don't forget to comment along the way on all of the blogs today to be entered to win the Cricut cartridge or K. Andrew Its Valentine stamp set that Erica is giving away today.

Winners will be announced on her blog on Tuesday!

If you get a chance please visit Erica's Webstore and enjoy 15% your total purchase this weekend.
Enter the code 15 during the third step of check out to see the discount.
She has everything crafty.... Cricut cartridges, adhesive, papers, stamps and so much more.....

LETE LINE UP For the Hop in case you are lost along the way!
AGAIN, THE LINEUP IN CASE YOU GET LOST ALONG THE WAY:S

SUNDAY
26. My Cricut Craft Room http://mycricutcraftroom.blogspot.com
38. Erica’s Projects http://ericasprojects.blogspot.com

Thank you again for joining me and remember, I am a new design team member and I love feedback and comments! Have a great Sunday!


Thursday, February 2, 2012

Theme Day Thursday with My Cricut Craftroom!


Today is Theme Day Thursday and the theme is


Winter Activities!
Last Christmas I sent a "snowman kit" to my Grandchildren who live in Nebraska. The kit included a felt hat and scarf, wooden "buttons" for the mouth, eyes and down the front as well
as a cute, orange wooden carrot for his nose! This December, they had a pretty good snow and were able to get out and build a snowman and use the kit! I knew these pictures would be perfect to use to feature a "Winter Activity"!


(Click on any photo for a larger view)
I made a 2 page spread featuring the Winter Woodland Cricut Cartridge as well as using

Holiday Cakes and Smiley Cards. I designed the entire layout using my wonderful Gypsy to assist me in sizing and placement! What a great tool!


I started with the beautiful snowflake/swirl border from Holiday Cakes {Winter3 on page 57 in the handbook} at 10.45 wide and then the plain base shadow also at 10.45. Using the shift key, I cut the snowflakes and the dots at 3.00" high. I used Bazzil cardstock for the main cuts of the swirls and base of it and the smaller, more delicate cuts were rather tricky. Those of you "paper lovers" know that Bazzil is a bit heavier of a cardstock. I had to re-cut a couple of times to get the pressure correct. My suggestion is to use this beautiful border in a larger size and to use a medium weight paper!


I just LOVE this Snowflake Border, don't you?

I added some gems and also some Silver Stickles to highlight the center of the snowflakes.

I layered a few of the snowflakes to give it more dimension as well as pop-dotting the border up from the paper.


(Left page view)

I used the Smiley Card "cool snowman" cut at 5.33 for the height for the black shadow

and then a height of 5.25 for the top layer. Added in all the extras from the 2 layer keys as well.
I decorated his scarf and hat with a white gel pen and his cheeks with a colored pencil. For the snow mounds on both sides of the layout, I made a free handed cut for those and then used the Cuttlebug with the Swirl embossing folder for the embossing. I just love how that turned out! I inked all the edges with some silver ink. The title "Winter Fun" was also cut from the Winter Woodland cartridge (page 71). I made a double layer frame from Fancy Frames and embossed the red layer of the frame with the Snowflake embossing folder in the Cuttlebug.


Mr. "Cool" Snowman! He is pop dotted to raise him up!


Trying to show the detail of the snowflake embossing on the frame.


Right Hand Page

For the right hand page, I did the same with the snowflake swirl border from Holiday Cakes and a smaller version of the photo frame with the snowflake embossing as I did on the left side.

This time I used the Snowman (page 46 from Winter Woodland) and the Snowman (that I made into a snow girl!) from page 47, same cartridge. I slightly altered the sizing on their hats and scarfs and did a little hand trimming to make it look good to me. I added Stickles, markers and a bit of colored pencils to decorate them and a spritz of Shimmer Spritz in Sparkle to the girls heart.


Meet "Miss Snowgirl"!


I cut the journaling box with my paper trimmer and typed up my journaling in Word. Inked edges of the snow, the snowmen and the borders on both pages!


Journaling block

Mr. Snowman!

I am not a big fan of winter weather, cold or snow, but I know the kids sure enjoy
playing in it! I can not say I have been disappointed that our Winter in Dayton, OH
has been pretty mild! I worry that we will get hit sooner or later - I just don't want the cold, snow and ice to arrive when it is time for Spring!

Thank you for visiting my blog and please visit
www.mycricutcraftroom.blogspot.com
to see more projects with the
Theme of Winter Sports or Winter Activities


I love comments! Please let me know if YOU enjoy the Season of Winter or

Winter Sports and Activities in additon to what you think of my layout and my adorable

Grand children! :)

Thanks for stopping by!