Wednesday, October 2, 2013

A Halloween Card!

#39
Challenge:   Halloween
October 1 - 7th, 2013

Hello Crafters!  
I am here with my Design Team post for the Cuttin' and Stampin' Challenge Blog where the "challenge" for this week is Halloween!
I had the wonderful opportunity to work with the adorable stamp set from Paper Smooches called Halloweenies.  I love the images as well as the sentiments on this cute set!   I was also lucky enough to get to use the Paper Smooches "Wise Dies" set also called "Halloweenies" that tie right in with the stamp set!
As part of the Design Team, I was also given some wonderful Bazzil Paper from the Arsenic and Lace collection!  Tammy has some wonderful specials if you head over to the Shop at the Cuttin' and Stampin' Blog.

Let's take a look at my first project for today.

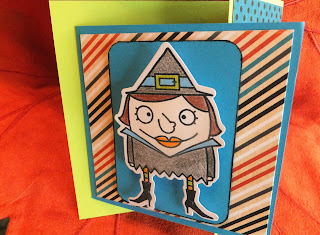
How cute is that little witch?  I stamped her with black ink and used the perfect and easy to use "wise die" that fit the witch just perfectly!  I then colored her in with simple colored pencils.
The Card Shape itself is called a "fake gate card" and I learned how to make it from Joy at Obsessed with Scrapbooking. She has all kinds of wonderful tips and hints on her blog. 
I used that adorable Bazzill paper for the base and the trim of the card.
Here is how the card opens and you can see the sentiments I used from this stamp set.
Here is the card completely opened up.  
These three sentiments were all separate and I stacked them on the acrylic stamping block and stamped them all at once.
Aren't the bats cute?


I wanted to decorate the inside as you unfold the card so I added another cute pumpkin from the stamp set!
Don't you just love the patterned paper from Bazzill? I chose the color pencils I used to tie in with the pattern paper.
Not only did I pop the pattern paper up with foam squares, I also mounted the witch on an
Action Wobble so she wiggles!
You can see a bit of the blur in this photo...that is the great action of the Wobble working!
One final look at my card!
I was so happy with the paper I received I decided to throw together another fast and very simple Halloween card. 
I simply layered some of the wonderful Bazzill paper and the sentiment card on the card!
Used foam squares to pop up the layer with the saying.
Couldn't be easier!
I am so happy you stopped by to visit and I hope you are inspired to make some Halloween projects. We would love you to link up your project at our Challenge Blog!

Please make sure your creation post has a link back to Cuttin' and Stampin'

Thanks for playing along we will be announcing the winners on October 11 2013.

You can link your project Here.

I am linking up to:

Photobucket
and also at:

Craftin Desert Divas


Tuesday, September 24, 2013

Use Your Scraps!


Weekly Challenge #38


#38
Challenge:   Use your Scraps
September 24 - 30th, 2013

Hello Crafty Friends!   Today is my Design Team posting day for the Cuttin' and Stampin' Challenge Blog.  This week we are being asked to "Use Our Scraps".  Any of us that do paper crafting always have little bits of paper left over. Do you save them or recycle them or just toss them in the trash? I am a "saver" - especially if it is a "special" paper- a pretty pattern, glitter cardstock,  or a neat texture.  But I really am good at saving any usable size left over pieces of paper and I turn to my scraps first when I am creating, before cutting into a brand new piece of paper!
Today I made a birthday card for a sweet friend that lives in Alaska. (Hi Lori!!) 
 Let's take a look at it and then we'll talk about it!

I used an adorable Paper Smooches Stamp from the set called
"Chubby Chums" set.  I recently purchased some water color pencils and stamped the chick on water color paper and then used the pencils to color her in- then used a water color paint brush dipped in water to blend. I then "fussy cut" around the chick. To create the "nest" she is sitting in, I drew a nest with the water color pencils and then again used the paint brush to help blend the color. I did a light blue watercolor back ground as well for the chickie and the nest to rest on!  
I used foam squares to give the card dimension.


I used another Paper Smooches Stamp for the little flag the chick is holding - from the same stamp set, "Chubby Chums".  I just hand cut a little banner shape.

For the inside sentiment I stamped the "happy birthday" from a super cute set called Sentiment Sampler.  
You can get your very own Paper Smooches stamps from The Cuttin' and Stampin' Challenge Blog. Tammy has some amazing weekly specials going on right HERE! 
I KNOW you have some scraps laying around your craft area!  Please join us in this challenge and enter your own project!

Please make sure your creation post has a link back to Cuttin' and Stampin'

Thanks for playing along we will be announcing the winners on October 4, 2013. 

You can link your project 

Thank you so much for visiting today! I'd love to hear your comments!


Sunday, September 1, 2013

End of Summer Blog Hop!

End of Summer Blog Hop

September 1st and 2nd, 2013

Cuttin' and Stampin' is celebrating 

We have five new Design Team Members to introduce to you.  
We also have our Weekly Special starting this weekend.  From this point forward, you will be able to purchase the items the design team is using for the weekly challenge at a discounted rate.   

So you can start the hop at Cuttin' and Stampin' and work you way through our 13 wonderful Design Team members.  Each of us has used the Bazzill Basic Paper collection called Lucy's Crab Shack.

You should have hoped here from Robin S.  blog
(www.scrapandshat.blogspot.com)

I hate to see Summer coming to an end, especially since here in my area, we had a cooler than normal summer, especially early in the season.  I guess I feel cheated!
I decided to create this cute little card as a birthday card for my sister in law. 
We got to enjoy a beach vacation together earlier this summer so as we say "goodbye" to summer,  I hoped this card would remind her of the fun times we had at the beach!


I used a file from the Silhouette store to cut the flip flops. I decided to use a brad and a little flower instead of the button shape that is included in the cut file.  

I inked the edges of the flip flops to make them "pop" a bit more.

I embossed the straps of the flip flops with the Swiss Dot Cuttlebug embossing folder.
How cute is that orange polka dot paper?  It is from the Lucy's Crab Shack collection that is on special in the Cuttin' and Stampin' store!

To create the "sand" I just tore the kraft card stock and then inked the rough edges. I tucked the flip flops in the sand dunes!


I found that I had the perfect sentiment stamp that says "Sole Sisters" and added that to the front of the card.  It is by Pink By Design's "Shop-A-Holic" set. 
I'm very close to my sister in law, and she's dealt with an ankle surgery and I've dealt with foot surgery and both of us have had some complications following.  So I thought "Sole Sister's" was a perfect sentiment for us! 
For the interior of my card, I added another patterned paper from the Lucy's Crab Shack collection.  I then typed and printed my sentiment and added that to the card as well.

I hope you enjoyed my little project and have fun with the rest of the Hop!

After me, you need to hop on over to Kim at:
Enter to win a great blog candy gift pack on the Cuttin' and Stampin' Challenge blog.

 Thanks for playing along we will be announcing the winners on September 6, 2013.

If you get lost along the way, here's a complete line up.

Cuttin' and Stampin' - http://Cuttinandstampin.blogspot.com
Thanks for hopping by - I always appreciate your comments!

I am linking up to:
Photobucket

Thursday, August 22, 2013

I sure hope you can join us for this fun blog hop! September 1 and 2nd! Meet our new Design Team members!

Tuesday, August 20, 2013

Monochromatic Challenge for the Cuttin' and Stampin' Blog!

#33
Challenge:   Monochromatic 
August 20 - 26th, 2013

Hello My Wonderful Crafty Friends!
Today is my Design Team Day for Cuttin and Stampin Challenges.

Our challenge this week - and I DO hope you'll choose to join in and accept the challenge - - is to make a Monochromatic Card!

I am not sure I've ever created one of my very own although I have always admired them!  So I gave it a try!
Let's take a quick look at the card and we'll go into some details!

I decided to make a simple but pretty in pink card!
I layered two different colors of pink cardstock to form the base of my card and added a very thin strip of this perfectly pink ribbion I had in my stash! 
 I then free hand cut
rectangles and ran them through my Cuttlebug. I used the Cricut "Swiss Dots" embossing folder for my center piece and A LifeStyle Crafts embossing folder from the set called "Jubliant" for the two side pieces.
I popped those rectangles up on foam squares to give my card some dimension and interest.

After digging around my stamp stash - I found this cute little sentiment stamp that says 
" a Little Hello" that fit perfectly on the edge of my card!  
 The stamp set is an older one by Hampton Art called "footlongs" and the specific stamp set was Hot Fudge Studio - which sounds really yummy but did not have a thing to do with the sentiments in the set!  
Here is one last look at my card to inspire you to join in the challenge!
Now please get busy creating and link up to us and you may win a prize!

Please make sure your creation post has a link back to Cuttin' and Stampin'

Thanks for playing along we will be announcing the winners on August 30, 2013.

You can link your project Here

I am linking up to:
Photobucket

Thursday, August 15, 2013

Square Card Challenge for Design Team Day!

#32
Challenge:   Square Card Challenge 3x3 or 4x4
August 13 - 19th, 2013

Hello Crafty Friends!  It's my Design Team Day for Cuttin' and Stampin' Challenge Blog and 
the theme for this week is the "Square Card Challenge".  We were given the choice to start with either a 3 x 3" or a 4 x 4" square base card to create our card.

My Godson and his long time girl friend just got engaged and I am very close friends with 

his parents, so I wanted to send not only my Godson and his Fiance' a congratulations on your engagement card, but one also to the parents of the groom.  They are quite excited to be planning a wedding for next August!  
Today I'll share with you both cards I created - first the parent's card - which is my 4 x 4 inch card!


Here is the front of the square card.  I found this precious file from the Silhouette America store and just knew it was the one I wanted to use!  
Using foam squares to give dimension and an "I Rock" gem as the diamond in the ring case, it is a 
simple yet sweet way to send congratuation wishes to the parents of the groom!
Here is the inside of the card:


And a little closer so you can read both sections:

I embossed hearts on a silver metalic cardstock and then "fussy cut" it out to
add just a little extra to the inside of the card!
Now, for the card I sent the Bride and Groom to be!
Just a slightly larger take on the same card idea!
 The following card shows the dimention of the embossed
hearts and how I used foam squares to pop up the couple.


 Here's the "diamond"!


 The sentiment inside:


I wish sincere congratulations and best wishes to Cory and Kristen as they begin this
exciting year of wedding planning!
Let's see what you create with either a 3x3 or 4 x4 square card!
Link up with us at the Challenge Blog!


Please make sure your creation post has a link back to Cuttin' and Stampin'

Thanks for playing along we will be announcing the winners on August 23, 2013.

You can link your project Here.

Also Linking up to:
Photobucket