Sunday, September 30, 2012

A Nutty Little Card!


Happy October!  Fall is definitely  in the air around here - the leaves are changing colors, there is a nip in the air in the evenings and I am seeing so many homes decorated for Halloween!  
Today is my day to post as a design team member on My Cricut Craftroom and one of our choices of assignments was to create a project with the "Letter Of The Day - N".  I decided to do my project based on one of my favorite seasonal decorations that come naturally from the Oak Tree - and that is acorns!
I think it was just a couple of years ago that I noticed acorns were popping up so much in home decor items and decided that they were the cutest little things and I began using them as part of my Fall Decorating. When I noticed that today's Letter would be the Letter N - I quickly decided I must make something with an Acorn on it! 

We at My Cricut Craftroom are still focusing on Breast Cancer Awareness and featuring the color Pink in our projects. Erica, owner of shop.ericascraftroom.blogspot.com has asked us to use some Pink in every project we do, even if it is on the back of a project.  For my project, even though I tried to fit the color pink into it, I just could not make it work - so you will see that I used Pink in my stamp that I put on all of my cards. 
Click on Any Photo for a better view!

So with all that covered now - - on to my project!
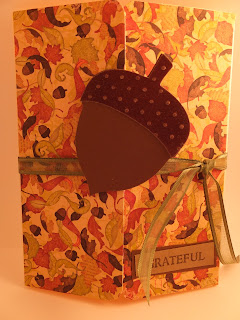
Let's first take a look at the finished card:
I found this cute acorn on the Cricut Art Philosophy cartridge on page 36 of the handbook.  I cut the  image at 2.80 inches along with the layer, which is the acorn cap. The layer is cut from a glitter paper and I also ran it through the Cuttlebug with the Swiss Dot Embossing Folder to give it even more dimension.


This third photo finally gives you a better look at some of the sparkle the cap of the acorn has!
But I just love the little acorn, so I took a lot of pictures of it!  tee hee hee!!

A tip when working with Glittered paper (which is what I used on the acorn cap) - - I always cut it with a multi-cut of 2 with the blade set at 4 or 5.  The paper is pretty thick and even if I set the blade on 6 I never get it to cut all the way through in one cut.
To create the gate fold card base, I started with a piece of paper that was 8 1/2 inches x 5 1/2 inches.
I scored that paper at 2 1/8 " and at 6 3/8" with my Martha Stewart score board.
I had an older paper pack that had this adorable paper with leaves and ACORNS on it!
This was perfect for my Nutty Little Card!  I cut 2 pieces to fit the flaps of my gate fold card and then rounded the corners for a finished look.


I then attached my acorn so it would overlap the gate fold when closed and created a little tag that says
"Grateful"  from a Close To My Heart stamp set called "Say It In Style".  I mounted it on a double mat of paper.
Sorry, again Blogger is not cooperating with me. I had this rotated in the correct direction and since Blogger wants to be a brat, it flips it for whatever reason!  Sorry for the neck pain you may experience from trying to look at it sideways!  

A touch of green ribbon was all that was needed to wrap up this project!( Yes, pun intended!).  Not only does the ribbon add to the decoration of the card - it is functional as it holds the card closed.


And there you have it....my Nutty little Letter N card!  
I hope you will head on over to My Cricut Craftroom where you will see not only other Letter N projects
but also projects created with the Cricut Imagine by my sweet design team sisters.
Thank so much for dropping by - - and please take a moment to leave a comment!  


Monday, September 24, 2012

It's Beginning to Look A Lot Like Christmas!


Hello All My Fun and Crafty Friends!  Can you believe that today is  September 25th  and that means it is ONLY 3 months until Christmas Day?  It seems to me that it was JUST starting to be summer time a blink of an eye ago!
And since Christmas is just 3 months away, today at My Cricut Craftroom we are featuring Christmas card ideas so you can get an early start!  I guess people who are super organized may have started their cards back in July, but for the rest of us ....at least 3 months out is a very good start!
I started making my own Christmas Cards about 2 years ago.  I had a foot surgery and was unable to walk for many months.  I am an "on the go girl" and being stuck at home was just driving me crazy. I usually buy boxed cards because I have a pretty long list of people I send Christmas cards to and the holidays are busy enough that I figured I did not need to add yet another task such as making my own cards.  Well, being tired up at home, I decided to at least make cards for close family members and friends.  One card after another - then I ended up making cards for everyone on my list!  I got such lovely compliments about them that I did it again last year and plan to do it this year as well.
One thing that is important to remember when you DO have to make a lot of the same card (or invitation, etc) is that you MUST KEEP IT SIMPLE.  At least for me - I can't do that many cards with a ton of steps and embellishments on them.  I like them to be cute but simple.
That is what I was going for with the card I created for today.  Although I will make several cards before I decide WHICH will be the one I chose to reproduce for all those on my list, this will be one of the contenders.
If you visited my blog a few days ago, you will know that on My Cricut Craftroom we have "turned pink"
in honor of the upcoming Breast Cancer Awareness Month.  All our projects are required to have PINK somewhere on them.  Right away I thought pink mittens would be absolutely adorable.

I found several cartridges that feature mittens on them, but I went with the Cricut  Holiday Cakes cartridge. (Yes, this cartridge was originally designed to go with the Cricut Cake Machine but you can use any cartridge in any machine! )
I found the cute mittens on page 47 and cut the mittens and the layer with the cuffs and the snowflakes at
3 1/2 inches.  I sprayed Glimmer Mist Sparkle on the cuffs of the mittens as well as the snowflakes to give a bit of glistening to them!

I felt the mitten needed a bit more decoration, so I added a bit of "bling" by using my I Rock Tool and attaching a gem to the middle of the snowflake.

I then just free hand cut with my trimmer a white cardstock layer to mat the snowflakes on.  I embossed that white layer with the Cuttlebug using the Snowflake embossing folder and rounding the corners with a corner rounder.  I inked around the mittens with a blue ink and also inked the snowflake layer.

In a Fiskars Stamp set (Called 'Tis the Season) I found the stamp that said Winter Wishes and thought that would be just perfect for the front of the card  and then inked the edges of that as well.

I used foam layering squares to pop up the mittens and tied a thin pink ribbon around the top of the card.
I was able to put this together fairly quickly and so it will be one of the possibilities for the card I will be sending out this year!

Do you send out Christmas cards?  Do you make them yourself or buy them?  I would be curious to know!
Please tell me when you leave your comment...and you know I love to read your comments!  
Thank you so much for stopping by and please head over to My Cricut Craftroom to see what other lovely Christmas cards my fellow design team sisters have created for today!  


Saturday, September 22, 2012

Have An Owlsome Fall Y'All Blog Hop


Welcome to the 
Have An Owlsome Fall Y'All 
Blog Hop!


If you arrived here from Cindy's Blog, (  http://www.cindys-greencricut.blogspot.com/) then you are on Track!

 We are so happy to have you join us today! The hop starts at Heather Lynn's blog so please start there.  You won't want to miss out on any of these wonderful projects! This is a 2 day hop and the line up will be different each day.  Please start HERE today (9/22) and tomorrow (9/23), so we can send you in the right direction!

 Our first "Well Owl Be" Blog Hop went over so well, we decided to do an owl themed hop 4 times a year! Our next hop will be right before Christmas and we hope you will come back and join us then, too!

One grand prize winner will win a Cricut cartridge and a stamp set sponsored by Erica's Craft Room! Thank you, Erica, you are so generous! Please be a follower and leave a comment at all of the stops in the hop for the chance to win. There will also be other blog candy along the way!

For today's project, I decided to make a treat/gift card holder. When I started designing my project, I had it mind that I would fill it with some autumn candy. After I finished the project I decided size wise it would be just the right size for a gift card!

I started by cutting out a Pillow Box at 5 1/2 inches from the Art Philosophy Cricut Cartridge (which happens to be one of my FAVORITE cartridges! (This box can be found on page 28 of the handbook). Sticking with the same cartridge, I then cut out two of the pointy oval shapes on page 59 in Art Philosophy to serve as my wings. I cut a slit in one side of the box to tuck one "wing" in, the other I glued the "wing" into the seam of the box.


I wanted this cute little owl to have a unique tummy - so first I added an oval (still using Art Philosopy, this time the image on page 42!) and then covered the oval by overlapping a bunch of circles (yes, I found THOSE on the Art Philosophy cartridge!) and inked the edges of each circle before overlapping and gluing them down.
I found scalloped circles as well in this same, very versatile cartridge so I created my owl eyes with these.
I love adding cute little googly eyes to projects and this owl seemed like the perfect candidate for them as well! I think the goggly eyes really bring him to life!
I had a different plan for his beak, but with the paper I wanted to use, it would not co operate (to thick to bend the way I wanted it to!) so I simply cut a triangle and added it to finish off his face!

There you have it - my very simple project for my very first Owl Blog Hop and my first blog hop outside My Cricut Craftroom!
I don't know why Blogger would NOT let me add this image in the correct direction!


Thank you so much for stopping by - I would love you to take a minute to leave a comment!

Please head over now to see what amazing project that
Heather D.  

If you get lost along the way - here is the complete line up:

 Sept. 23rd Line up-Day 2

Heather Lynn- http://heathernovinger.blogspot.com/


An'Jenic G. - http://anjenicgibson.blogspot.com/


I hope you OWL will come back and visit me again sometime soon!
Thank you again, my friend Heather Lynn, for inviting me to join this very talented group!


Thursday, September 20, 2012

What Cute Critters!


Happy Friday to my fellow crafty friends!
The My Cricut Craftroom Team has turned "Pink" in honor of Breast Cancer Awareness Month which is every October.
YES- we know we are early - but we try to stay ahead of events so if you see something that inspires you, you have time to make it yourself.   Every post for about the next month will have PINK on the project somewhere. It may be small but it is our small way of showing awareness to this important cause.

Today is Scrapbook Friday over at My Cricut Craftroom.  As our assignment, we are to make a scrapbook layout about Cute Critters.  So many possibilities, but I knew that I did not have too look far for my inspiration.  I am "blessed" to have three cute kitties in my home - Copper, a big, loving older cat (I think he is now almost 12 years old but acts like a young cat!), Oliver, the most expensive "Free" cat who was very ill when a friend rescued him when he was only about 6 weeks old and Lily - the kitty we got to keep Oliver company, who is very shy and scared of any strangers. 
Let's start with a quick look at the two page spread.
Please click on any photo to get a larger image.
I apologize that the photos are rather dark. I took photos on two separate occasions but it was either at night or on a gloomy afternoon.  


The hardest part of the assignment was getting really good pictures of the cute critters.  Copper is quite
photogenic..he seems to know he looks good and likes his photo taken.  Ollie and Lily are a different story. Ollie always seems to move just when I think I can get a good photo...and Lily - forget it!  She seems to know that I have a camera in hand and will constantly move and not look at the camera for anything!
She really is a very pretty cat and has the softest velvety fur - - but with her shyness, no one ever knows!
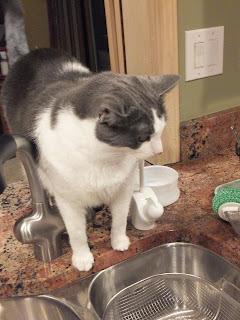
Please meet Copper.

 This is Oliver (Ollie)

 and here is Lily, avoiding eye contact with the camera!

After getting the photos that I felt I could use, it was time to get to work on the details of the layout.  I saw the image on page 38 of the Create A Critter cartridge and just knew that I had to use that cute cat to "represent" Lily on my layout.


I cut both the main image as well as the layer and I used a shiny silver paper.  I cut the adorable little nose out of pink glitter paper and added a pink bow tie.   This little kitty is cut at 4 inches.
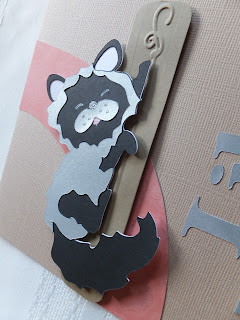
For my next cat I found this cute and kind of scraggly cat from the Four Legged Friends Cricut Lite Cartridge.  In some ways he reminds me of Oliver, although other than colors - it doesn't really look like him.   This image and all the layers were cut at 3 inches.

Here is my left hand side of the layout:


For my next cat I found this cute and kind of scraggly cat from the Four Legged Friends Cricut Lite Cartridge.  In some ways he reminds me of Oliver, although other than colors - it doesn't really look like him.   This image and all the layers were cut at 3 inches. 


Blogger is not playing nice today. No matter what I do, and although my photos we in the correct position before I add them in my post, it is turning some of them sideways. Sorry about that! 
The third cat was also cut from Four Legged Friends.  I used the flip feature so he was looking in the direction that I wanted.  I chose various "gold" colored papers to sort of represent Copper!  I thought adding the gem eyes I added on most of the cats really give them the "glow" that cats really do have!  


The right hand side of the layout: 
I LOVE this photo of Copper!  He is such a lover boy!

For my last cat in the layout, I used the cartridge called Zooballo on page 84.  This cat was just added because I thought it was cute and to balance out the page - it doesn't represent any of my kitties!  Maybe it is a "future" cat?  I hope not!  Besides the gem eyes, I also ran the layer through the Cuttlebug to add some texture!
I continued to use the Zooballo cartridge for my title "My Cute Critters".  Using my trusty Gypsy, I welded the letters together.


I hope you enjoyed "meeting" my sweet kitties and also liked my layout today!
I would love to have you to take a minute to leave a comment!
 

 Be sure to stop over at My Cricut Craftroom to see more scrapbook layouts today!
Thanks for visiting!