Tuesday, June 26, 2012

Thinking of You card


I am happy to be able to share with you another project for Card Creating Tuesday with My Cricut Craftroom!  
Today we were asked to create a Thinking of You card.  It's great to have this type of card on hand ... you can use it for so many occasions such as a Sympathy card, a Get Well card or simply "Just Thinking Of You" card when a friend needs some good vibes sent their way!
To start my card, I found the Word Art that said ...Thinking Of You on the Gyspy Wanderings cartridge that is free and loaded on the Gyspy when you purchase it!  How's that to actually get something FREE!  
I cut both the main feature saying as well as the shadow and embellished it by cutting another flower
to layer on top of the base flower (and how cute is it that it flower takes the place of the letter "O" in the word "of"???  
I inked the edges of the base as well as the extra flower piece and curled up the edges somewhat. I added a large glittered brad to the center as well
I then cut the card base from one of my all time favorite cartridges, Art Philosophy. 
I know it is impossible to see, but this beautiful floral paper has some embossed portions on the flowers as well as some glittered sections. It is soooo very pretty!
I wanted the inside of the card to be a bit sturdier so I cut HALF of the card and glued it on the inside.
The floral paper was a double sided patterned paper and I love the plaid it offers!
I knew I wanted to add a flower to the front of this card...so I had to decide what size and what type of image would be best!
I decided to bring out the yellow flowers in the pattern paper and went with the cartridge called
Flower Shoppe (page 18, sunflower) - - cut at 2 inches.
This cartridge has so many beautiful flowers, both 3D as well as images that lay flat. If you don't have this cartridge, you can get it in Erica's Store right now!
To finish it up...I did some inking around every edge, hand cut a base to rest the
"Thinking Of You" sentiment and also added some leaves from the Flower Shoppe cartridge (Page 22, 2 "Mums" leaves, flipped one on the Gyspy, cut at 3/4 inches).

 I also used foam squares to raise up the sentiment off the page a bit for more dimension.


I hope you enjoyed my project for the day!
Please be sure to stop by My Cricut Craftroom to see the other projects my fellow Design Team members
made for Card Creating Tuesday! 
I love to read your comments, so won't you please take a couple of minutes to leave your thoughts? 
Thanks so much for visiting today!

I am linking up to Sarah Hamer's Linking party:
Photobucket


Thursday, June 21, 2012


Happy Thursday to you all!  Happy Summer!  At My Cricut Craft Room, it is Theme Day Thursday.
On Thursdays, Erica comes up with a theme or a cartridge that she wants us to use design our project.
I am featuring the Stand And Salute Cartridge.  It is a wonderful cartridge to use for all kinds of Patriotic Holidays - including Forth of July, Memorial Day, Labor Day, Flag Day - - and also has so many cute images that would be wonderful for Military Pages, some are good for travel (with a Statue of Liberty a Liberty Bell and a suitcase) and possibly even "boy" pages or boy scouts!
What???  You do not own this cartridge?  Well, let me "enable" you a bit -  head over to Erica's Store 
and you can get your very own cartridge at a great sale price!  Look around while you are there - - she has some great pricing on such a wide variety of products!
On to my project for today!
If you happened to stop by my blog last week, you saw my page layout for the Patriotic Theme Day, featuring my sweet little grand daughter and grandson!  Today, I feature my other Granddaughter, Aubrey at the same Forth Of July event.
How cute is she?  Her little outfit was just adorable - and check out that head band!  She certainly brings a Sparkle to our lives!  
From the Stand and Salute Cartridge, I cut the stars found on page 32.  I added letters from Life Is A Beach to spell out her name for the title.  (The stars we each cut individually at 1 1/2 inches.  The letters at one inch).
Again from Stand and Salute, I cut the "sparkler" from page 50 at 3 inches.  The frame for the photo and my typed title were just hand cut.

After taking the photos of this simple page, I decided that I needed to add some red stickles (from Erica's Store) .   It certainly did brighten up the page, but guess who forgot to take another photo AFTER the stickles were dry??  Yeah, that would be me. I am sorry ...but it is ohhhh so cute with stickles!
I am sorry this close up image of Aubrey's Name in stars is sideways. I tired and tried, but even though it is in the correct direction in my photo file, Blogger would NOT post it in the right direction. Hope your neck is not hurting from turning sideways to view this!  

My second page is also of Aubrey - (she IS my first grand daughter, after all!!) and I again made it very simple with using the "dog tag" images from the Stand and Salute Cartridge (pages 70 and 71).  I was quite happy how nicely the words cut on the tags - I am loving the font they used on this!  What do you think?
I cut the dog tags with the words "Life, Liberty and Pursuit of Happiness" each at 3 inches.  I then used the solid dog tag on page 61 to make a backer for each tag so the words showed up in the selected colors.
I simply framed this cute photo with white cardstock and threaded the dog tags onto a red ribbon.
QUICK, EASY and CUTE!  

Hope you enjoyed my projects from the Stand and Salute Cartridge .  Please hop over to My Cricut Craftroom to see what some of the other design team members decided to create today! 
Thanks for stopping by and please take a minute to leave a comment. I enjoy reading every one of them!
Happy Summer Time!!

I have also entered this layout in the BBB2 challenge!  

Thursday, June 14, 2012

Patriotic Day at My Cricut Craftroom

HAPPY FLAG DAY!!

Thank you so much for stopping by to visit today!  Today is my day to post for My Cricut Craftroom, where I am so very lucky to be a member of Erica's design team!
This week we were asked to make something  "Patriotic".  I was lucky enough to have a great collection of photos from my Grandchildren's first Forth of July in their new home and new neighborhood. Their neigborhood had a Forth of July celebration, with a little parade of bikes and trikes and wagons and some games for the kids.  My Daughter in Law, Alyssa, always makes sure the kids look so cute for whatever the holiday they are celebrating. It was the perfect opportunity to make a cute little 8 x 8 inch album - simple but full of these adorable grandchildren!! 


This adorable page of my grandson Cooper and sweet little Lainey on her first Forth of July!
I used the Stand and Salute cartridge to cut the United States image, the stripes and star layer and the cool wording that says  "4th of July".  

Here is a better view of the Text that says "4th Of July" and comes on the Stand and Salute Cartridge (which is available at Erica's store right HERE and it's on sale!!)
I cut the word "Happy" from another cartridge, but I am sorry to admit I didn't write down what I used and my memory is not helping me out on this!  Ohhh, come on...you know you have those moments too!
If you don't....just humor me and don't mention it!


I simply layered strips of red, white and blue cardstock on the page and then framed the photo with red card stock and then an outer border with white cardstock.  It is a very very simple page... just enough to highlight those precious children! 
Please come back next week when I feature a second page from this album featuring the Stand and Salute Cartridge once again!
Thanks so much for stopping by!
  Please visit My Cricut Craftroom to see the other Patriotic projects that the members of the design team are sharing today!


Wednesday, June 6, 2012

Would You Ever Guess Wednesday - A Luggage Tag!


Hello Crafty Friends!
Today is WYEGW - Which stands for Would You Ever Guess Wednesday at My Cricut Craftroom.  It is the day we use any of the feature keys EXCEPT the main images on a Cricut Cartridge. It is a great way to really explore the cartridges and see what is available!  

Today, I am featuring the Graphically Speaking Cartridge. I decided to make a luggage tag.  This is a tag to be used to help identify my luggage when it's coming off the luggage rack.  I usually tie a ribbon on my handle but I thought this was a cute way to help me easily find my luggage when so many bags look the same.
 First of all, I wanted this tag to be sturdier than just using card stock - so I wanted it to be heavy, like chipboard.  I like to save and use boxes from cereal, frozen pizza, etc. as a way to recycle and it works great for projects like this!  When I cut boxes on my Cricut, I use a multi-cut of 2 or 3, depending on the thickness of the box, keeping the pressure at max.  I do not have a deep cut blade but never have problems with this type of thickness as long as I use the multi cut feature!
I started with page 60 on the Graphically Speaking Cartridge.   Using the "word" button I cut the tag using the "shift" button to just get the tag shape.  This gave me the base for my tag.
I then cut out two of the same shape to cover both sides of the tag with cardstock.

I adhered the purple card stock using my ATG Gun  so it would be stuck on there firmly!

Returning to the cartridge handbook,  I then cut the image on the "word" button again on page 60 of the handbook at 2 1/2 inches.  This gave me the word "mine" . . . which I though was a cute idea for a luggage tag!

I adhered the green card stock onto the purple card stock.  I considered making this a hidden pocket luggage tag with a slit where the curve on the green card stock is, but then decided I just wanted this to be a method to find it and not have my personal information on it. 
I wanted to add a bit more decoration to the tag, yet keep it flat and simple.  I cut a flower, using the icon button found on page 44 of the Graphically Speaking cartridge.  I cut that flower at 1 1/4 inches.


For the reverse side - - I used the word "travel" found on page 61 of this same cartridge.  You will find it under the "type" button.  I used the "Cut To Length" feature on the Cricut and set it to cut out at 
3".
To give a bit more interest, I used a white gel pen to make some stitch marks around the letters.
I picked the "compass rose" on page 61 (still in Graphically Speaking) and cut it along with the blackout image at 2 inches.
My plan is to laminate the tag for even more durability.


I sure hope you enjoy this simple but useful project.  I read each and every comment - - won't you take a moment to leave your thoughts?
Please head over to My Cricut Craftroom to see what my other crafty Design Team Members have come up with for today!
Thanks for visiting!

Friday, June 1, 2012

June Blog Hop at My Cricut Craftroom!

Hello and Happy June!  
Happy Summer!
It seems the month of May just flew by - - hard to believe it is time for this month's 100 Cricut Cartridge Blog Hop over at My Cricut Craftroom.  You should have arrived here from Erica's Project .


 If you just happened to stop by my blog, you may want to hop on over to the beginning at My Cricut Craftroom so that you can see every one of the projects from my fellow design team members!  They do amazing work!
I used three cartridges for this blog hop:   Sweet Treats,  Spring Cottage and the Cricut Lite Cartridge called Meow.

Let's start with my project I made with the Meow Cartridge.  Having three cats at home, as soon as I saw the Cricut Lite Cartridge called Meow, I knew it was a "must have"!   I decided to make a wall hanging for my laundry room , right above my laundry sink - next to my washer and dryer.  I found I was always trying to figure out what those little washing symbols on clothing meant and would find myself having to search on line every time I had an article of clothing with those symbols listed instead directions written the "old fashioned" way.  (Remember, clothing USED to say either hand wash, line dry, or wash in cold water, etc??).  Now most of the clothing has these symbols that are not always easy to figure out!  This is a reference chart for me - - didn't need it to be fancy, but once I saw the Clothes line with the kitty on this cartridge, I decided that would be perfect for this project!  
I cut the Cat hanging on the line along with all the various layers offered. 

I glued it onto kraft cardstock, but had to join two pieces of cardstock together in order for the chart that I printed off the internet to fit.
I believe I got my information from this site:
I simply used a hole punch to punch a hole for hanging. I did not laminate this, but since it is hanging above my laundry sink and used around wet clothing, it would be a great idea!

Here it is, hanging up, all ready for use!  

My second project is a birthday card I made using the Sweet Treats Cricut Cartridge.
I thought it would be fun to make an easel card  using an Action Wobble that 
I received from Erica's Store.   

 Closed front of the card.
Card opened in the "Easel" position.
I used the Ice Cream Cone on page 31 of the Sweet Treats Cartridge handbook.  I cut the base image from a piece of kraft card stock, the "vanilla" ice cream using the "shift" button on the main image, and then using the "layer" button, I cut the "chocolate topping" layer.  I used Glossy Accents on the "chocolate" layer to make it shiny and slick like a hard chocolate coating and embossed the ice cream cone portion using the Cuttlebug.  I also embossed the white "vanilla" ice cream to look as though it was "swirled" on the cone!
I created several layers for the ice cream cone to rest on - and on each layer I used a corner rounder on the edges and embossed one of the layers.  I used a stamp from Fiskars called Happy Birthday to stamp the word  "Celebrate" on the front, with a ribbon attached above it, and the words "Wish Big"  on the inside of the easel base.  I added two layers of foam squares to make the "wish big" sentiment pop up enough to hold the easel card in the open position.


I added the ice cream cone to the front of the card using an Action Wobble.
Thank you, Erica for "playing it forward" and sharing the Action Wobbles with those of us on the design team!
 
  Side view - showing the Action Wobble Spring!
Here, you can see both the sentiment from the Front of the card as well as the base of the card, when opened and displayed!


I saved my FAVORITE project for last!  
I recently received the Spring Cottage Cartridge that I purchased from
Erica's Store!   She has amazing prices on her cartridges and carries such a wide variety of
scrapbook/paper craft items!
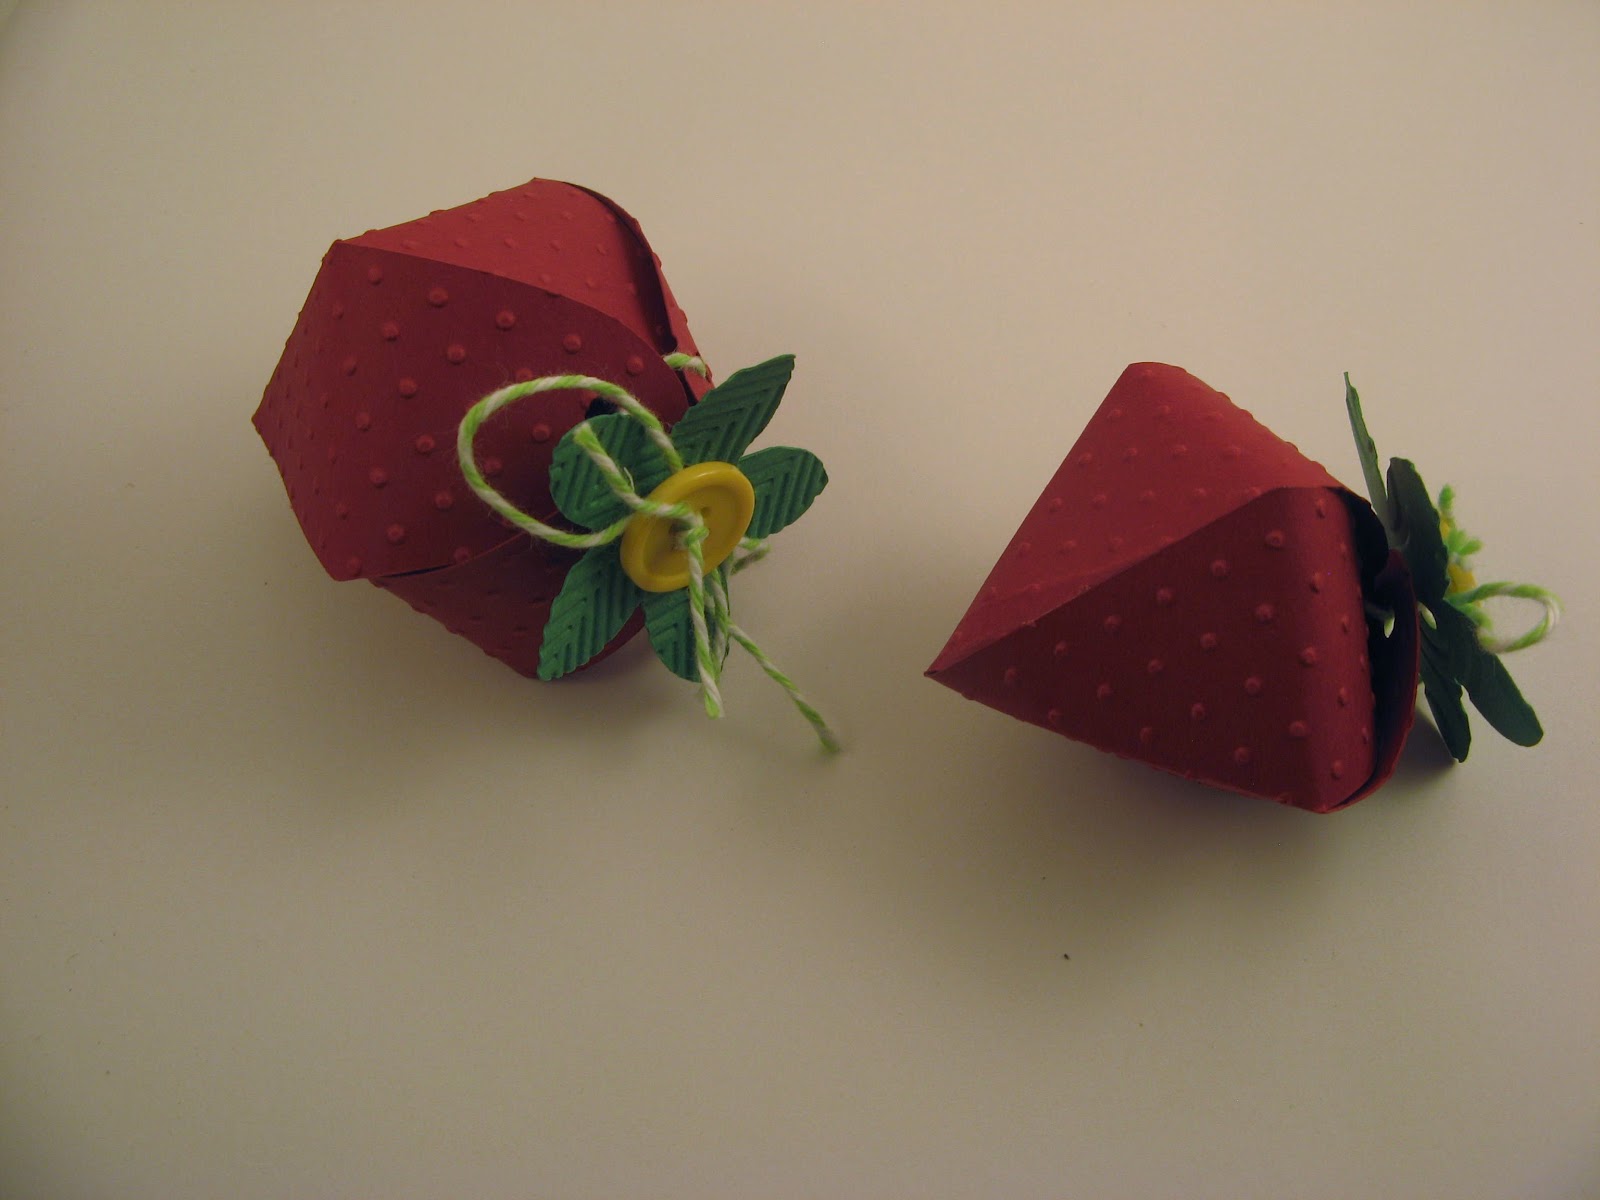
 I could not wait to try out the adorable Berry Basket and the 3-D strawberries!  
HOW CUTE IS THIS????
The strawberry boxes open up if you simply untie the twine...making them the perfect hiding place for a little surprise!  Depending on the size you make them, you could put some little candies in them or if you made it large enough, another special gift (maybe jewelry or a gift card???).
I do suggest a wrapped candy, such as Toostie Roll Midgets, Starburts, Peppermint Hard Candy,
or if they will not be in a hot area or in the sun, Hershey Miniatures or other small wrapped chocolates!
As you can see, I cut a variety of sizes of strawberries for my berry basket.  After all, when you buy a basket of strawberries or go pick them at a local fruit farm, you do not always have every berry the same size!
I embossed the base cut of the strawberries using the Cuttlebug Embossing folder called "Swiss Dots". It is just perfect for giving the look of those little seeds in strawberries!
I cut the green leaves for the tops of the strawberries and also embossed them with a couple of different embossing folders.  I tied the strawberry with green and white Doodlebug Twine to close the box, then added the leaf to the top of the berry.  I threaded yellow buttons with the same twine and added those to the very top of the leaves to give more interest.  


A special "thank you" to my hand model, my beautiful daughter Kim, for holding the strawberries and helping me get a better shot!
After they were all finished, I piled them into the Berry Basket and they are ready for decoration or a special little gift for someone!


I cut the Berry Basket from Brown Cardstock at 9 1/4 inches.  I embossed the handle to give it a little something extra!


I am just so happy with how this project turned out!  What do you think??
It is now time to head over to visit  my friend and fellow design team member
Sarah, to see her amazing creations for today!
Please go to:  www.craftingwithsarah.blogspot.com.
I LOVE TO READ YOUR COMMENTS!  
I hope you will take a few minutes to leave a comment for me!
Have a great weekend!
(Linking up to the Tuesday Linking Party at Pink Cricut Designs)