Tuesday, February 26, 2013

Welcome from The Scrapbooking Queen and Cuttin' and Stampin"!!

Today the design team from Cuttin' and Stampin'  are very excited to be 
sponsoring The Scrapbooking Queen today! There was just a little confusion- we thought we were the sponser for The Scrapbooking Queen on Feb. 25th, but turns out we are on Feb. 26th, so I apologize to my readers who are wondering WHY this post was up on Monday, taken down and now back for Tuesday!  :)  Things happen, right????
Anyway, we gathered some fun projects to show the versatility and variety of products available from A Muse Studio.  From color-coordinated cardstock, embellishments, and ink to a full complement of cutting dies and Copic markers, A Muse Studio has it all!
I created three very simple but fun projects today. I can not tell you how much I am enjoying working with the Amuse Studio products.  The stamps are of such high quality, the paper is a sturdy cardstock and the embellishments are super cute!

Let's take a look at the first card I created and then some of the details.
(Please click on any photo for a better look!)
 My first card was made for a friend who is dealing with some health problems of her beloved dog.  If you are an animal lover, you know our pets are very much a part of our family.  I wanted her to know I am thinking of her and she should "hang in there". Wouldn't you know Amuse had the perfect stamp for this purpose?

 Both the monkey on the vine and the sentiment are from the Amuse Studio Stamp set "The Mighty Jungle".
The cardstock is from Amuse Studio as well  - grape and papaya.  The grape is not showing up very true to color.
I popped up the monkey with foam squares to give some dimension and added a ribbon from my stash for the final touch!

Card Number Two is a "Thinking Of You" card.
I cut the card base using a file from the Silhouette America site.
The stamp is from the Amuse Studio stamp set called 
"Cushioned In Comfort".
 Adding several layers of cardstock adds interest to an otherwise simple card. I used Amuse
Lime Cardstock and Papaya Cardstock as well as some paper from my scrap bin.
I embossed one layer with the Cuttlebug and added some adorable "bling" with
Amuse Studio Twinkle Stickers on the corners. 

 I used PrismaColor colored pencils to color in the images.

The interior of the card:. 
 Sorry this image is rotated...I could not get it to load properly!  For the inside of the card, I cut
two different shapes using the Cricut Artiste cartridge

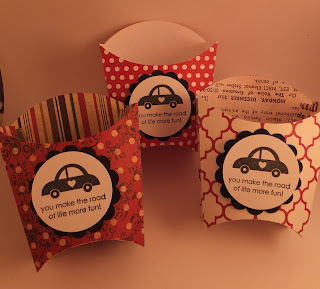
 My final project is one of my favorites!  I made "fry boxes" for treat containers for a little
get together.  The fry box file was from the Silhouette site.
The stamp was from a set called "Love Conquers All".
 I used several patterned papers for the fry boxes.  
 I used a circle punch to punch the stamped image and then layered it on a scalloped circle.

 I layered the stamped image on the box using foam squares and feel it really adds a lot of interest.
Here they are ready for "gifting" ...filled with caramel corn.  I used Wilton treat bags to package the caramel corn inside the fry box, then tied it up with a ribbon! 
 I hope you will head over to Tammy Smith's Amuse Studio site and check out all the fantastic products 
that you can order and start making your own fun and fantastic projects!
Please be sure to check out The Scrapbooking Queen's Site as well! 
Thanks so much for stopping by today!  


Sunday, February 24, 2013

Birthday Love for Our Kreative Karma

Our Kreative Karma


Hello my crafty friends!  Thank you so much for stopping by today on my birthday!  I am showing off a project that I created for the blog called Our  Kreative Karma.   This blog was started by a group of friends who wanted a fun, stress free way to share our crafts.
The theme for the month of February was Love and Birthdays.  I have quite a few birthdays in the month of March that I need to make cards for so I decided to get a head start on them and created a birthday card for my sweet little Granddaughter who will be turning 3 in March.
Here's a peek at the front of the card:
I found the file for this card ( which is called a 3 D Spinner Card) at the Silhouette site.
I've never created a card like this so I thought it would be fun to give it a try and
that a spinning card may be fun for my little granddaughter.
I decided on this sweet little owl for the front of the card. 
You can see I did a bit of embossing on the body of the owl and used foam squares to pop her
up!  How cute are her little eyelashes? 
As you slowly open the card, the front rotates and shows the 
other side - -
which has a cute little cupcake on it!
I also typed my sentiment and added it to the inside flap of the card.
I did a bit more embossing on the cupcake and then inked it to make it stand out a bit
more ...and of course, had to use a foam layering square to give it more dimension!
Thanks so much for stopping by and visiting my blog and please be sure to check out 
other projects at Our Kreative Karma.

I am linking up with:
Photobucket

Wednesday, February 13, 2013

An Exciting Announcement!

Hello and Happy Wednesday Everyone!
I am very happy to share some exciting news today!  I have been invited to join a incredibly talented group of crafters on a brand new Design Team!  The business is The Pinque Peacock and I am ever  so lucky to be one of the "Pinquette's"!

I met Jessica and Heather, the owners of the Pinque Peacock, when they joined another Design Team I was on and we instantly became friends!   They are both very talented crafters as well as the nicest friends you could ask for!
Here is a lovely collage of all of my brand new fellow design team sisters!
I'm excited to be joining several "old friends" and excited to get to know quite a few new friends!

Have you had a chance to check out the shop at the Pinque Peacock?  Oh my goodness, you are in for a wonderful surprise if you have not!  Please head over to the shop and check out some of the beautiful goodies that a HANDMADE by Jessica and Heather!
Please be on the lookout for some fun projects using these amazing products coming up very soon on the 
Thanks for stopping by!

Thursday, February 7, 2013

Simple Valentine's With Amuse Studios


Weekly Challenge #5 Tuesday, February 5 th thru February 11th.
Create a Valentine card.  
(you don't need to use an A Muse stamp to enter)

Hello Fellow Crafters!
I'm excited to share with you some Simple Valentine's today for my post over at 
Cuttin' and Stampin'.blogspot.com
What fun I had making these Valentine's to share with you using the wonderful stamps, paper and twine from Amuse Studios!  
For today's projects, I used two Amuse Studio Stamp sets:
Love Conquers All and
Love Is In The Air. 
If you are interested in these stamps or other Amuse products, please visit
https://www.amusestudio.com/cuttinandstampin

For my first project, I used this cute cupcake stamp from the Love Conquers All set.


 I colored it with markers directly on the stamp.  I made a band that I ran through my paper crimper
(haven't used that tool in quite a while!) and it was quick and simple!
To give some dimension, I simply popped up the top layer with the foam squares.

Project number two from the same Love Conquers All set.
I love this stamp set because although it was perfect for Valentine's Day, it can
work for other occasions as well!
This is I Love You To The Core!

Again, I colored directly on the markers before stamping on plain off white card stock.
 I layered the image and used foam mounting tape.
I cut a layer from Kraft Cardstock and embossed using a heart embossing folder.
Using the Love Is In The Air set, I added the air mail stamp and  the
Happy Valentine's Day sentiment!

I wrapped a red ribbon around the kraft cardstock layer and it was finished! 


Project number 3 is a Hot  Chocolate packette holder.
 I created the hot chocolate holder with a file from the Silhouette America store.
Once the holder was created, I used this super cute stamp to decorate!

When I saw this adorable mug with the sentiment, I knew I just had to use it for the hot cocoa holder!
I simply slipped my cocoa pack into the holder and tied it up with some Amuse Studio Twine!

Perfect for a Valentine Gift!


Last but not least, here is a SUPER SIMPLE Valentine using the Amuse Studio Die.
 All  I had to do was cut out 3 "love" die cuts and layer them on black cardstock.
I used this cute heart paper (also from Amuse) as my card base.
Adding a couple of hearts was the final simple touch!

I hope you will join us for this week's challenge.  Please head over to
http://cuttinandstampinchallenges.blogspot.com/
 and add your simple Valentine's!  I can't wait to see them!
Don't forget to get your own Amuse Products (and you won't be disappointed!)
head on over to shop at:
https://www.amusestudio.com/cuttinandstampin

Thanks so much for stopping by today!!