Saturday, May 11, 2013

Happy Mother's Day!


Hello My Crafty Friends and HAPPY MOTHER'S DAY to all the Mom's out there!
Welcome to the "Mother's Day" Blog Hop!  
We're so happy you could join us today to honor Mothers, Daughters, Aunts or any other woman who has been a great influence in our lives!  
In addition to seeing a lot of awesome projects, there is some blog candy available too.  Miranda will be giving away a Michael’s gift card.  To be eligible for the blog candy, you are required to visit each stop in the hop and leave a comment!  The winner will be announced Wednesday, May 15th on Miranda's blog! 

 I chose to make a Mother's Day Card for my Daughter In Law. During a recent visit, it truly warmed my heart to see how much love and care that my Daughter In Law gives each of her children. She's a very busy Mom of 4 children aged 8 and under - but she makes sure each child gets plenty of one on one time and they each feel special.

Here is the card I made for her :  
I used a cut file that I found at Bird's Cards. I thought it was just so very pretty. I chose to back it in a pale pink paper to make the cut out design really stand out. I picked a pink polka dot patterned paper for the top of my card.
I used a Silhouette file to cut the layered label and stamped it with the Happy Mother's Day sentiment.           
I added a tiny stripe of ribbon between the layers of the card.
   
  1.               I decorated the inside of the card with the pale pink paper on one side and a layered strip of the pink along with white cardstock, wrapped with a pink polka dot ribbon.

There you have it!  I hope she enjoys it!

Next on the Hop is:


Should you get lost along the way- here is the entire line up. I know you won't want to miss a single project!


Tabetha - http://tabethascreations.blogspot.com/


Sarah - www.sarahbiswabic.blogspot.com


Teresa- www.createenjoyshare.blogspot.com


Jessi- www.mylifeinartsncrafts.com


Vanessa http://wwwpaperkraftsunlimiteddesings.blogspot.com/


LLuvia- http://sweetbirdmemories.blogspot.com/


Carolyn-http://www.grandmacarol46580.blogspot.com/


Ashley - http://marinewifesscrappinlife.blogspot.com/


Sarah Mae - http://itswhatkeepsmesane.blogspot.com/


Jennyfer - http://www.scrapalajen.blogspot.com/


Vicki - http://scrapbookingcreationsbyvicki.blogspot.com/


Pam - http://lovebugcreations3.blogspot.com/


Sandy- http://scrapbookblessings.blogspot.com/


Happy Mother's Day!


Thursday, May 2, 2013

Children's Birthday Cards`


Hello All You Crafty People!

Today it is my day to share a creation as a member of the Design Team at 

Our theme this week is "Children's Birthday" and it could not have come at a better time!  My sweet granddaughter Aubrey will turn 5 years old in early May and I wanted to create a couple of cards just for her.

 Yes, I created two cards to share!
Here is the first one!

My two oldest Granddaughters love  the LaLaLoopsey dolls and t.v. show and during a recent visit, I got to play dolls with them!  I knew she would love having a card with a LaLaLoopsey on it!
Thankfully, someone from one of the Silhouette groups I belong to shared this file with me.
It is a print and cut, meaning you print the picture on the computer then take it to your Cameo for cutting around it.  
I added a "loopy" frame and also a background layer that I embossed.
LaLaLoopsey is elevated with foam squares for some dimension.
My original plan was to put her on an Action Wobble so she could
"dance" - but she was not wide enough to accommodate a wobble behind her!  
I accented her crown with a little gem for some sparkle!
I decided to add a colorful layer to the inside of the card with a little bit 
of ribbon to "jazz it up"!
This shows the dimension from the foam squares both under the doll and under the embossed layer.
One final look at the card!

Now allow me to share "Card Number Two" for Aubrey!
During our recent visit, we took a fun trip to the Children's Museum. My granddaughter was enjoying playing with a toy owl while we were there - and I told her maybe Grandma could get her one of her own sometime.
I could not find the EXACT owl but I did manage to purchase and send one and I wanted a card to represent that owl.

Again, the owl and the branch were cut using my Silhouette with two separate files from their store. This time the owl was large enough to put it on a Action Wobble, so he teeters back and forth on the branch.
I inked all the edges and folded the leaves to give them some shape and dimension.


The owl on the Action Wobble
Close up of the owl!
For the interior of the card, I used the Silhouette sparkly gel pens again to write the
sentiment.  
"For Aubrey" is also written with the same sparkly gel pen on the front, again,
using the Silhouette! I LOVE this feature! 
Here is the soon to be birthday girl during my last visit!  I only wish I could celebrate with her on her actual birthday!

Thank you so much for stopping by and I do hope you will consider making a project and linking up to the Cuttin' and Stampin' Challenge this week!  Head HERE to do so!


Thursday, April 25, 2013

Who's Ready for Cinco De Mayo?

Hello, Hello, Hello!
Welcome to my post for the Cuttin' and Stampin' Design Team today.  I am so glad you stopped by.
Coming up in just a couple of weeks is Cinco De Mayo (May 5th) and we were asked to create projects to celebrate this holiday.  Well, as you can probably see by my blog design, I am a big fan of margaritas and Cinco De Mayo is the perfect reason to enjoy them!
There is a  local family run Mexican restaurant that I frequent and have had the opportunity to get to the know owners/staff.  Today I created a poster that they can hang up to advertise the specials they will be offering on Cinco De Mayo.
Let me show you my project and I'll give you more details!
The name of my local restaurant is LaPinita, so when I found a cut file for this cute Pinata  I knew that was the perfect image to use on the sign! 
This restaurant is decorated in very bright, cheerful colors and I wanted to create the sign so that it would blend right in with their style.  
Sorry for this being rotated, but in my photo editing it was facing the correct way, but I could not make adjustments here in blogger!

I added a "googly eye" to the Pinita's face and attached the pinata to the base of the sign with foam squares to give it dimension.
And another rotated photo...UGGGGHHH!  Blogger doesn't play fair sometimes!


I loved the arched Cinco De Mayo topper I found in the Silhouette store!  I welded letters together to form the word, "specials".  

There is my finished sign! It will be fun seeing it hanging in the restaurant prior to Cinco De Mayo!
Cheers!
Thanks for stopping by and I hope you will enter into the Cinco de Mayo challenge with us!
We love to see your creations!

#16
Challenge:   Cinco de Mayo
Go Here  to enter your creations.


Wednesday, April 24, 2013

Featured on the Pinque Peacock


Hello My Lovely Crafty Friends!
Thanks for stopping by on my Pinque Peacock project day!  

My sweet friend Jessica, owner of the Pinque Peacock, sent me this beautiful button to use on a project 
(featuring Peacock colors) this month. 
I love the lovely little "gems" on the satin material and wanted the button to be the highlight of my project. 
Let's take a look at the card I created for you today.
Once I knew I wanted the button to be the focus of my project, I started checking out some files on the Silhouette site.  When I came across this sunburst file, I knew I had just what I wanted!
Since we are featuring Peacock Colors this month on the blog, I layered various peacock colored cardstock behind the overlay of the sunburst. 
This allowed me to have this pretty button in a place where it would stand out and be noticed!
I knew this card needed just a little something "extra" so to tie in with the silver gems on the button, I added some liquid pearls to the beams of the sunburst.
I hope you enjoyed my project for today. I hope you will head over to the Pinque Peacock 
store and check out their fabric covered buttons and their beautiful flowers and the Oh So Pretty Stick Pins and all the wonderful goodies Jessica has for you!
Thanks so much for stopping by!


Saturday, April 13, 2013

Welcome to the Pinque Peacock April New Release Blog Hop!


Hello to all of our Pretty Little Peacocks
Welcome to Pinque Peacock’s
April New Release
BLOG HOP
Photo: So is everyone ready for the Upcoming April New Release with Pinque Peacock?  I know I am along with all the Pinquettes.  We are so thrilled to play with the new goodies and share them for your purchasing pleasure.  Be sure to join us for our New Release Blog Hop starting on Friday.  Awesome Inspiration by the Pinquettes and some more fun Giveaways.  Can you ever have enough Giveaways from just one company???  <3
We hope you will enjoy your time as you hop and that you feel inspired
to create after visiting the Talented Pinquettes' Blogs! This hop will showcase projects that have been created using some of the April NEW RELEASE Products from Pinque Peacock.
We are thrilled to have you joining us this month as this is a very special
New Release of products and we are all so very excited to share it all with you!  Our April Release is full of beautiful color palettes, wonderful inspiration from the Pinquettes, and fabulous sparkle and shine as we celebrate PEACOCKS.

After hopping, be sure to visit the Pinque Peacock Shop on FB to order the New Release items to jazz up tons of your projects.

You also will want to stop back on Monday, to see our announcement of
another Prize Giveaway that will be available as we sponsor the Craftin Desert Divas' Newest Link It Up Party!

!!!!Now, let's talk PRIZES!!!!
One winner, who has hopped all 3 days (Friday, Saturday, and Sunday) of our
Pinque Peacock April New Release and followed the RULES BELOW will win
this . . . .

 $15.00 PAQ BUNDLE PRIZE
which includes all of this . . . .

(4) Beaded Stick Pins

(6) Large Felt Poppers

(2) Layered Garden Beauties

(2) Large 1.5" Fabric Covered Buttons (FCB)

(6) Small 3/4" Fabric Covered Buttons (FCB)

(1) 2.5" Splendid Swirl (w/Embellished Center)

Do YOU want to WIN?         

Here is How****:

1 – Hop to ALL of the stops over the course of the 3 Day Hop and comment at each Pinquette Blog (Lineup for all 3 Days is below)

2 – Follow the Pinque Peacock Blog and Facebook Page/Shop

3 – Follow EACH of the Pinquettes’ Personal Blogs who are participating as Hop Stops this weekend.

****You MUST do ALL of the steps above to be included in the random drawing
for the prize. We would hate for you to lose out on winning just
because you didn't follow these easy rules :( ****

The Hop will remain open until Wednesday, April 17th, at 8:00 a.m. EST.
The random drawing will be held sometime during that week that follows and announced by April 24th.
Now,
if you find yourself Hopping off the Path on any of the three
days, you can use this Lineup to get back on the Right Track . . .

                                                                       
DAY 1 (4/12/13):

DAY 2 (4/13/13):

DAY 3 (4/14/13):

Thank You for hopping along and we hope you had Loads of Fun!
Peacock Hugs!


NOW- let's get to my first project for today's hop!
As stated above, we are featuring PEACOCK COLORS and some fabulous new designs from the Pinque Peacock Store.
Let's start out with a picture of the finished project and then I'll give you some details!
When I saw this file for a peacock in the Silhouette store, how could I PASS it by?
I chose to use my purple pen to have it draw the peacock (my first time using the pens and I am IN LOVE with them!).

I then had the Silhouette cut out the image and then I cut yet another white version to give it a border.
I layered this pretty little peacock on a mat that I embossed, and then used foam squares to pop up that layer from the base of the card. I was THRILLED to find cardstock in the perfect peacock colors! 
  I just love the detail the pens made! 
You can see the embossing behind my peacock too!

I then wrapped some perfect fibers around the base of the peacock...again,
how lucky I was to find perfect peacock colors!
To finish this off, I added a BEAUTIFUL stick pin from the Pinque Peacock collection!
One final look at this card!

I was having such fun with some of the APRIL NEW RELEASES I had to make one more project to share with you today!
A little home decor project!

Here is a close up of this lovely Pinque Peacock silk fabric button that I applied to the little terra cotta planter!
I layered and wrapped some peacock colored ribbon around the little pot and attached the button.

How excited I was to find this PERFECT ribbon...it just screams
PEACOCK!  I took a few photos out in the sunshine so you can see the variation of 
color in this cool ribbon.
Click on any photo to enlarge.
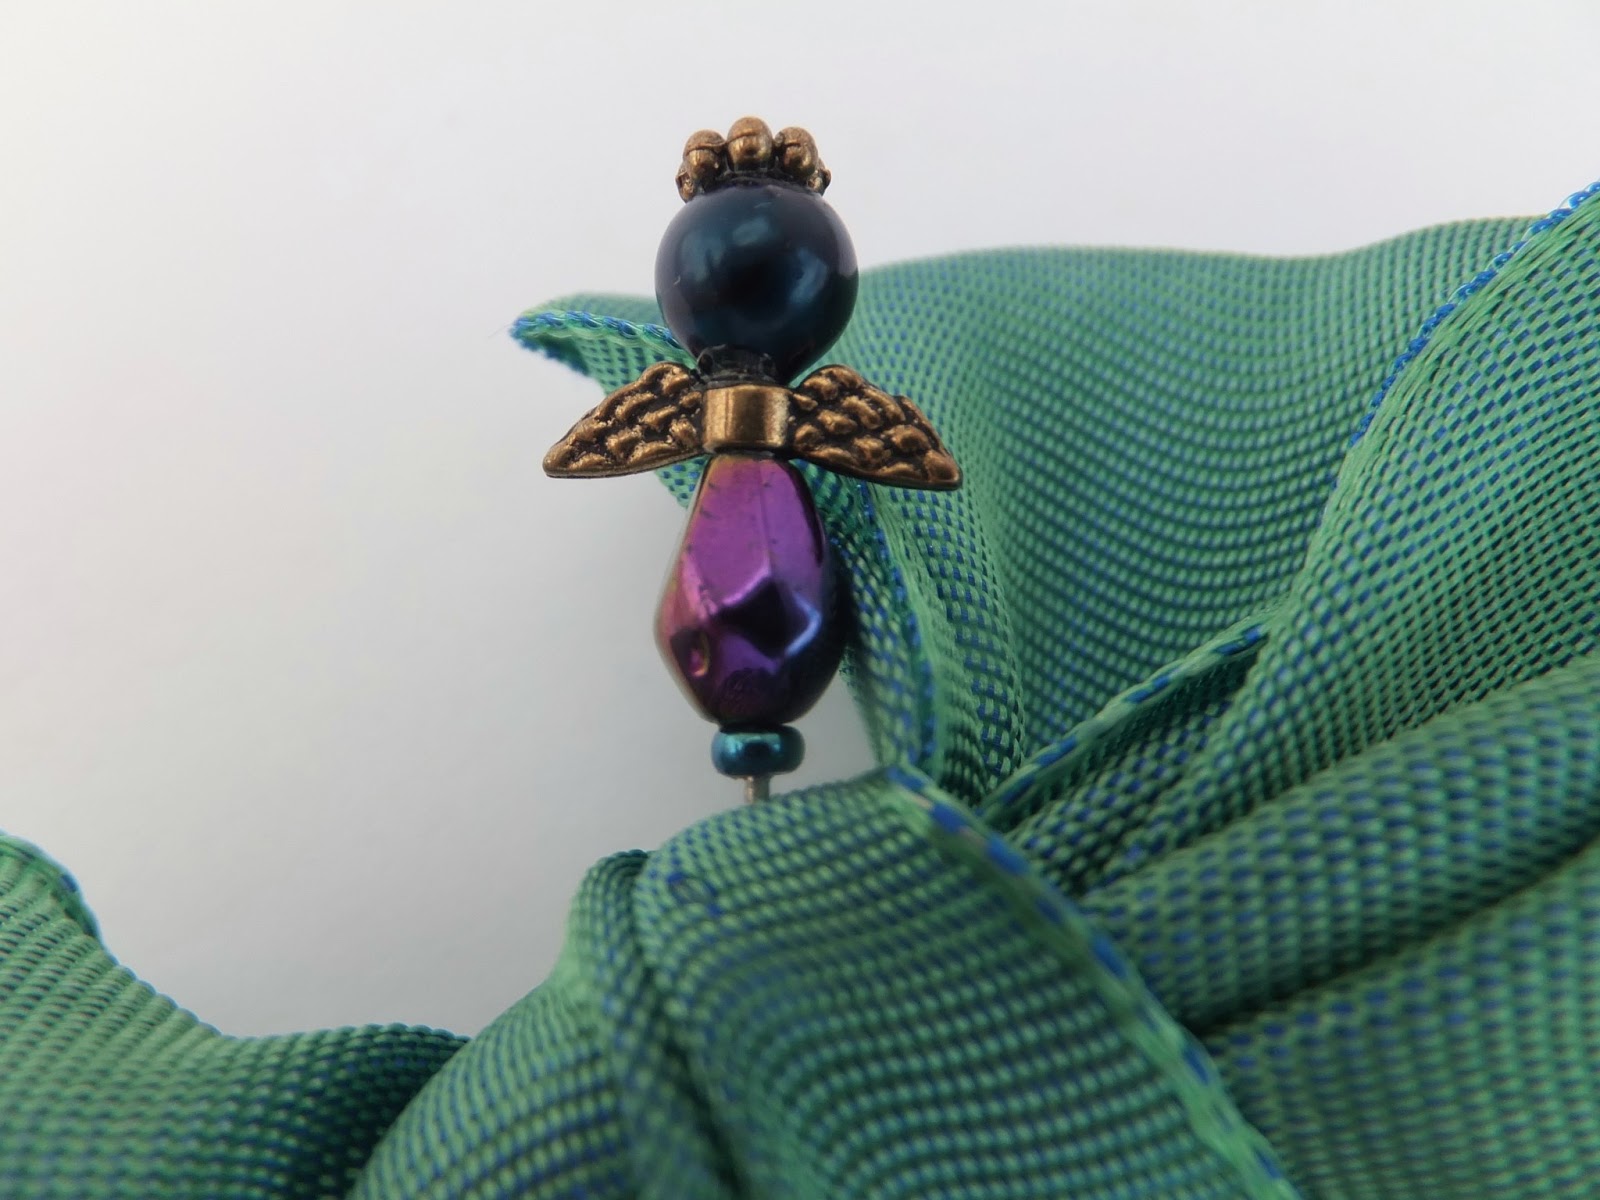
As the final little touch to this bow, I added the Angel Stick Pin,
available at the Pinque Peacock shop
 Isn't she adorable popping out of my bow?

Now we add the bow to the top of this cute little bird cage I found at Michael's!


I have the perfect Spring Home Decor Item!


Thank you so much for visiting!  I am the last Pinquette on the hop for today! Please remember to come back tomorrow to see some more amazing projects by my design team sisters!
  I love to read your comments, so please take a moment to leave some love.
Remember to visit all the Pinquettes so you can be eligible for the prize! 


Thursday, April 4, 2013

Sunshine and Smiles!

Hello My Crafty Friends!
Today I am happy to be sharing a post that I am also making for the Our Kreative Karma blog. For the month of April, our theme at Our Kreative Karma is Sunshine, Smiles, Summer or things that make us smile.
My project today covers a little bit of all of that!
Now, for the very first time EVER, I am sharing with you a card that is <GASP>   NOT COMPLETELY FINISHED!  Oh my, Oh my!  Why would I ever do that, you ask?  My card is for a very special birthday of a very special person and just in case she happens to check this blog post I did not want to have the final sentiment and details on the card!
Now, that taken care of, let me show a photo of the almost completed project!
When this project is completed, I will have the sentiment on the left hand side of the card that is now blank!

Can you see why this card screams SUMMER, SUNSHINE AND SMILES to me?
I sure hope the recipient likes it, but it is everything that makes me smile and think of summer!
This card is called a Side Step Card.  I like that it gave me more surfaces to create on so when you view the card you see the various levels which almost created a "scene" type view to me.

You can see that the top "step" has a sunshine - which I cut several of and curved the edges.
The second step is a palm tree and some sand!  I love the beach and I don't get the chance to visit any beaches very often!
 and then the front step is a margarita!  I cut the top layer of this in velum so it looks like the glass
is slightly frosty from the frozen yummy beverage inside!
I also covered the backs of each of these cuts so it looked more finished.

I used bright, cheerful colors which just say "Summer, Fun, Happy,Smiles" to me!

I sure hope that the recipient likes this card!  She is having a "Big"  birthday and we will be celebrating at the Beach!  

Thanks so much for stopping by and visiting!  I love to read your comments!

I am linking up to:
Photobucket