It is my day to post in My Cricut Craftroom for Would You Ever Guess Wednesday, (we call it WYEGW) where we are able to use ANY cut on a Cricut Cartridge that is NOT a featured cut on the main page of the booklet. This week Erica asked that we use the feature key "TAG".
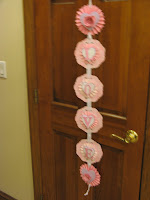
I chose to make a Valentine Banner. I decided I needed to try a home decor project for a change and picked the Art Philosophy cartridge as my main cartridge and also used Ribbons And Rosettes.

I decided to use the word "LOVE" as the featured word on my banner and wanted to make
a vertical wall hanging for my door.
I started by cutting out all of my base tags from chipboard. I found that using the multi-cut feature I only had to cut it two times, when using max pressure. My chipboard was a medium weight, all recycled from pizza boxes, cereal boxes and cracker boxes! Doesn't it feel good to use something we would otherwise throw away and make something pretty from it?
I selected the Tag Feature on page 51 of Art Philosophy. I have not had this cartridge for very long and have only made a few cuts from it, but OH MY GOODNESS!! ..... I can tell this is going to be one of my very favorite cartridges and will soon be a "go to" cartridge of choice!
I used my Gyspy for designing. I cut out four of the tags and I rotated them to a vertical direction instead of the way it is pictured in the booklet.


I then cut my pink patterned heart paper (old paper from my "stash" - in my attempt to use up what I have! ) to cover all four base tags (one for each letter in the word L-O-V-E (obviously of the same size as their base chipboard to cover perfectly!).
I then selected the Font Layer to cut the capital letters (found on various pages throughout the booklet) and used the Hide Contour feature to eliminate the decorate circles. I like the way those decorative letters look, but didn't want to do a double layer on the letters, so using the decorative cut outs really made no sense!

 I then cut the Scallop6 cut from the Ribbons and Rosettes cartridge on page 41. Using my Gypsy, I welded several of the cuts together and then manipulated another cut to get it to the total length I wanted.
I then cut out two heart shapes from Ribbons and Rosettes on page 30, one slightly larger in lavender and a smaller one in white to layer and make them stand out a bit more.
I added each of my letters to that after first embossing the 2 sets of hearts with the Heart Swirl embossing folder.
I added silver stickles to the letters to make them stand out a bit more and did a lot of foam tape to add even more dimension to the project.
Cutting two slightly larger rosettes to add to the top and the bottom of my wall hanging was the final step in my design.
I decided it needed a little more embellishment so I decided to add paper flowers.... both from the wonderful Art Philosopy cartridge, one from the font feature on page 69 and the other was shift key of the font on page 68. I just got a new quilling tool that makes rolling those flowers a lot quicker and easier!


Inside each flower, I added a rhinestone with my I-Rock tool to give a bit of "bling"!
It was difficult to get a very good photo of the entire banner - but here are a couple more views:


You can click on ANY photo to make it larger and easier to see the detail!
I hope this inspires you to make a little home decor of your own and to explore the many cuts you can find on every cartridge by looking at the various feature keys!
I was so touched by the kind comments from my last posting for the Blog Hop I participated in and would sure love to hear your thoughts on today's project.
Thanks for visiting. To see more projects for WYEGW , please be sure tovisit some of the other wonderful projects at Erica's My Cricut Craftroom!
Have a great day!


15 comments:
now that's creativity with a tag feature!! so pretty too! love it!!! -dt sis Doris
You did a GREAT Job I really like this, thanks for sharing.
kim
This is great. Thanks for sharing.
kim
This is extrodinary work from my perspective. I never envisioned a banner taking such a beautiful form. It should serve as inspiration for others to be creative. Thank you for sharing your terrific project!!
This is AWESOME!!!! I'm going to have to try this! ♥
Tiffany
Love the flowers and the glitter on the banner.
DT sis
Love the bling, Love the flowers, Love the rosettes, Love the embossing...Love IT! This is fabulous!
DT Sister - Jenny R
this is beautiful
This is beautiful! Love it!
TFS!
Connie- your DT sista
http://conniecancrop.blogspot.com
Oh my goodness that looks fabulous very pretty
DT sister
I Love it !!! Great job ....
Very pretty! Art Philosophy is one of my most favorite carts ever.
WOW Teresa!!!! You did a FABULOUS job on your love banner!!! The colors were so soft & dainty and your flowers are gorgeous....very stunning my dear sweet friend. You've inspired me to make my first banner! ~ LOVE YOURS!!!!!
This is gorgeous!
Very Cute Theresa!! great Job!!!
xoxoxox
Jess @ homespunelegance.blogspot.com
Post a Comment
I love to hear your thoughts!